Shirt and Tie Tutorial
Feel free to share this tutorial with the credit link above.
You must have some knowledge of a paint shop program to do this tutorial.
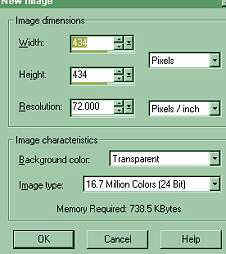
Open a new image. The size of theshirt is up to you. I like to use a
large image to work on, 500 x 500 is normally a good size.
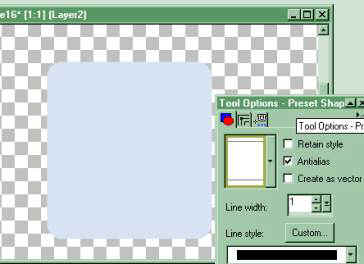
As I stated before I always like to add a New layer to work on.
Select a color you would like your shirt to be.
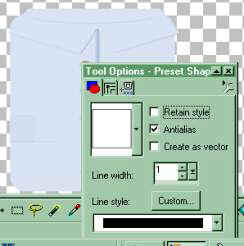
Click on the Shapes tool and choose the rounded rectangle with antialias
checked. Draw the rectangle to the size you want your shirt to be.
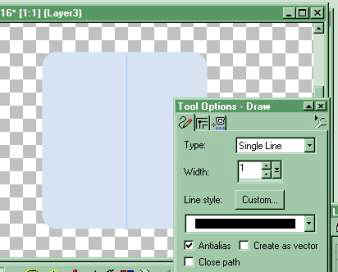
Next, Select a color slightly darker than the one you choose for your shirt.
Click on a new layer.
Click on your line tool and draw a line straight down the middle of your rectangle.
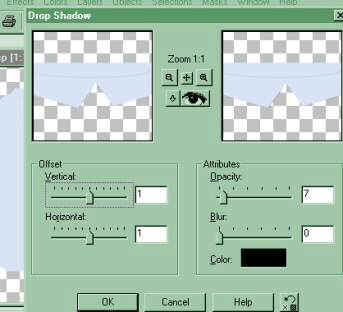
Next I used a very faint Shadow - setting vertical and horizonal to either 3 or 4.
Opacity about 40 and blur about 5. Can play with it to your liking.
Open a new layer.
For Our sleeves you would go a little below midway down and draw a small
rectangle with a Soft Edge Bevel and or slight shadow applied again.
Copy and mirror as new layer.
Then for your cuff put a smaller rectangle on the end of that rectangle. Go to
Inner Bevel and apply soft edge lowering the width and depth to about 2.
Then apply a slight shadow again, if you desire.
~~~~~~~~~~~~~~~~~~~~~~~~~~~~~~~~~~~~~~~
Make a new layer again. You can skip this layer or not. Using the line tool again,
Draw very smaill lines horizonally slightly to the left on your line - about 5 to
be your button holes. You can shadow them or leave as is.
Now you apply your buttons. I created a new layer before placing each button,
so I could move them to align them. For my buttons I used the shapes tool.
I used the preshape 038 button in Paint Shop Pro. You can use a similar one
or you can use your regular paintbrush with all the options set to 100, the
size to about 11 and shape set to round. The just click on the paintbrush where
you wish your button, select the button with your magic want and use the
round bevel in your Paint shop program or eye candy bevel. If you
would like the look of thread in your buttons. Choose your thread color, set
your paintbrush or line tool to 1 or 2 and draw tiny lines or dots
I placed about six buttons down and two on the cuffs.
~~~~~~~~~~~~~~~~~~~~~~~~~~~~~~~~~~~~~~~
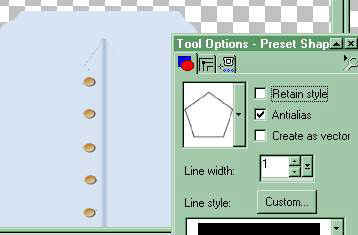
Click on a new layer and name it collar. Open your shapes tool and choose Pentagon.
Usethe color of your shirt and draw the pentagon over the top of your shirt, wide
and short. This is your collar.
If it comes to wide etc., you can always erase part of it later on.
Next you click on your Selection tool, The square with dash lines. Set the shape
to triangle. In the middle of your new collar, as below. Now click on cut or your
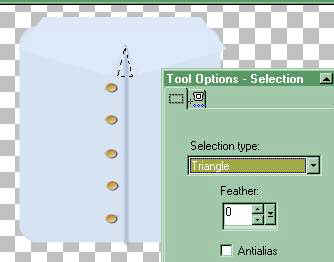
scissors on your toolbar. Now apply a slight shadow again.
Click on your Selection tool again set to Ellipse. Make an
ellipse with only about a quarter of it on your collar layer, as
shown below.
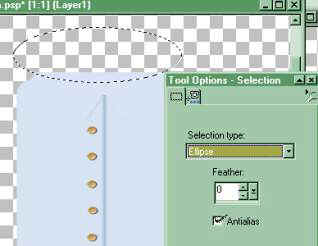
Now go to Effects and apply the shadow below.
This was to give the opening look, but you can skip this part if you like.
You can merge visible layers anytime. If you want to apply a tie below your
collar, you would wait to the end then.
~~~~~~~~~~~~~~~~~~~~~~~~~~~~~~~~~~~~~~~
If you wish the pocket and handkerchief in it. Add a new layer.
Use your shape tool with your shirt color selected, and draw the small
rectangle midway between your sleeve and collar.
Add a new layer. Size your
handkerchief from the Tie tutorial and place it to fit in the pocket.
![]()
Move this layer below the pocket layer.
~~~~~~~~~~~~~~~~~~~~~~~~~~~~~~~~~~~~~~~
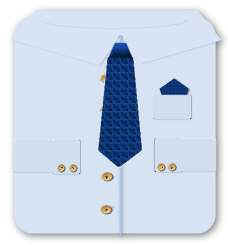
Now place your tie on your shirt and your done.

Unless you want to make it look like a knot.
Then add another layer naming it knot. Boy am I tired!
Use your shapes tool again using the same color as your tie this time.
Select the round rectangle and make a small rectangle on top of your tie
in the middle of the collar. Then click on inner bevel and use the round
bevel lowering the width, height and shine to give a slight knot look.
Then move that layer down below your collar layer.
~~~~~~~~~~~~~~~~~~~~~~~~~~~~~~~~~~~~~~~
You can erase any parts that might need adjusting, like
the edge of the collar on the graphic below to look like the one
on the top of the page.
~~~~~~~~~~~~~~~~~~~~~~~~~~~~~~~~~~~~~~~
Someone, who did the tutorial added a label. Great idea! and
you could use it as a name tag or watermark.
I used the Attacks filter on the logo tag below, which would
give a good cloth edge look for a shirt label.
~~~~~~~~~~~~~~~~~~~~~~~~~~~~~~~~~~~~~~~
The first part is the Tie and handkerchief Tutorial.
~~~~~~~~~~~~~~~~~~~~~~~~~~~~~~~~~~~~~~~
Feel free to E-Mail with questions or corrections.

If you use any of our graphics or share this tutorial,
you must provide a link back to https://mystyqcat.tripod.com/
Thank you
| Animated Background | |
|---|---|
| Frame on Fire Animated Tutorial | |
| Color Basics Tutorial - Part I | |
| Color Basics Tutorial - Part II | |
Check our main Tutorial page for new Tutorial listings at
~~~~~~~~~~~~~~~~~~~~~~~~~~~~~~~~
Our New Site Index is at Storme Millennium Index.
~~~~~~~~~~~~~~~~~~~~~~~~~~~~~~~~
This was created with PSP 7 ~ download a trial version.
[Links][Care][Help][Parlor][Storme Central] [Millennium] [Storme II][Den][Yard][Shelf]
[Garden][MadCat][Patriotic Porch][Study] [Patch] [Attic] [Ring] [Vacation] [Furship] [Add link]
[Designs] [Adoptions] [Halloween][Birthday] [Loft] [Snow] [Lists][Island] [Hostess]
[cards and services][Banners] [Graphics]][Award][Library][Game][Award][Card Index]
[Samples]Loft2][AdotptionPorch][Library][Tutorials][Garden Friends][Island2]
[Haunted Courthouse][GraphicII][Index][Postcards][Fireworks][Cat]
This page was touched up on January 5, 2004.