
Clover Tutorial
I wanted to make a simple clover for St. Paddy's Day graphics and developed this simple graphic and
tutorial. Feel free to copy and share with a link back to our site.
You can copy the heart shape below, highlight it with your magic wand, then color it. If you like,
you can then use inner bevel, as I did.

If you prefer to use my clover leaf, copy below, highlight it with the magic wand, invert the
selection and copy it.

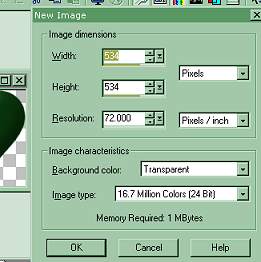
Open a new transparent image as below. I like a larger workspace then needed. You
can always crop it later.
I always use a new layer in case of mistakes. You can always delete unnecessary layers
later or will disappear, when merged.
Now make your clover leaf from a font or copy one from mine.
Copy your leaf and paste as a new image. This way if you have any problems
you have a leaf. Save this leaf as a tube in the psp format. This way you'll have it also
if you want to work with it in the future.
Deselect your original image. Go to selections, select none and click.
Now paste the copied leaf as a new layer on your original 534 by 534 image.

Now on your tool bar click Image, then Rotate.
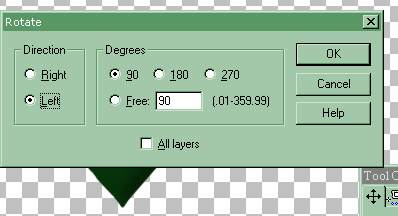
Rotate to the left at 90 degrees and click okay leaving all layers unchecked.
Now line this up to the bottom of your first leaf.
Repeat Image and rotate, but click rotate to the right with 90 degrees checked again,
click okay. Line it up to the base of the first leaf also.
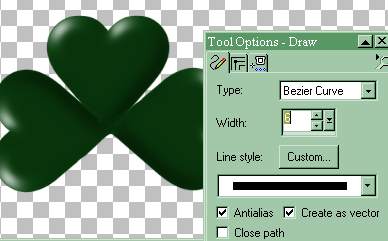
Your image should now look like below.

You can leave it like this or use your retouch tool with the smudge effect and smudge
the lines a little. Or you can use your shape tool and make a small green
circle and bevel it as I did on the clover on top of this page.
Click on new layer.
For your stem, you could simple draw a line or paint a line.
I used the line draw tool set at
I drew two lines and shaped them by pulling a little. I erased what
I didn't want or some of the length. When done go to Layers, then
convert to raster layer. With your image still highlighted you can bevel
your stem, if you like. For beveling you can use the Paint Shop Program's
inner bevel or Eye Candy's bevel boss.
Then move your stem layer below your leaf layers to hide the edge.
You can do that by dragging it down on your layers tool bar or going to
Layers, Arrange and moving it down. If you made the middle circle,
you would want to put the stem below that also.

If you have any questions, just write. Please put it's about tutorials in the subject line.

Don't want to make your own? Just find a font with a clover leaf in it, fill it with color,
bevel and create!

Remember to provide a link back if you share our tutorial or use any of
our graphics.

~~~~~~~~~~~~~~~~~~~~~~~~~~~~~~~~
Our New Site Index is at Storme Millennium Index.
~~~~~~~~~~~~~~~~~~~~~~~~~~~~~~~~
This was created with PSP 7 ~ download a trial version.Check our main Tutorial page for new Tutorial listings at
| Animated Background | |
|---|---|
| Frame on Fire Animated Tutorial | |
| Color Basics Tutorial - Part I | |
| Color Basics Tutorial - Part II | |
[Links][Care][Help][Parlor][Storme Central] [Millennium] [Storme II][Den][Yard]
[cards and services][Garden][MadCat][Patriotic Porch][Study] [Patch] [Attic] [Ring] [Vacation]
[Samples][Furship] [Add link] [Designs] [Halloween][Birthday] [Loft] [Snow] [Lists]
[Adoptions] [Island] [Hostess] [Banners] [Graphics] [Game][AdotptionPorch]
[Award][Graphics II][Library]Garden Friends] [Haunted Courthouse][Library]
[GOF angels][GOF gallery][Tutorials] [Fireworks][Cat][Island2][Card Index]
[]Loft2][Tutorials][Index][Fireworks]
Our clover was trimmed on January 20, 2004.
Clover blooms through Tripod.